Fallen London Wiki:Screenshot Tutorial for Editing
| This guide is outdated and has been retired! You can find the current guide at Fallen London Wiki:How to edit the wiki. This guide has been preserved as an acknowledgment of the history of Fallen London and of the contributions to the wiki. If you don't think this guide should be retired, please explain in the Comments or at Category talk:Retired. |
Wiki note: This guide was never completed, even when it wasn't outdated.
Click the screenshots to view the full versions.
Editor Screen Introduction[edit]
To the bottom right of a page's title, there's an 'Edit' button you can press to update a page. Click it now.
Welcome to the editor screen!
There are two versions to it: Visual and Source. They are reflections of each other, as if you're staring into a distorted mirror, yes. 'Visual' is the dressed-up face and 'Source' is the frank face of a page. You can switch between them by clicking the pen symbol in the upper right corner of the editing area.
- Visual - beginner-friendly, and code-fearing folk strictly walk here. Also handy for adding templates and tables!
- Source - spooky code-infested forest which all code-fearing folk shy away from...at first! Once you familiarize yourself with the editor screen, you'll find it much faster and easier to edit pages through their source code.
(If you're confused, honestly it is pretty easy to look at the source code for an existing page and see how that's formatted- if you're trying to edit an action or item page, look at one of the ones already up to see how they work).
Creating New Pages[edit]
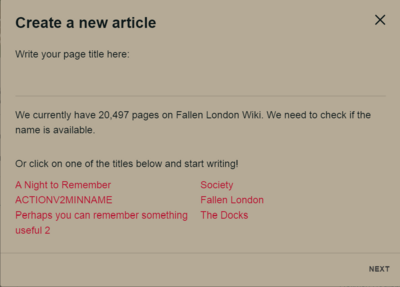
In the upper leftcorner, click the 'New Page' button. A new page will then ask you for the page title.
Congratulations, you made a new page!
Adding Templates[edit]
Your first question here might be "What's a template?" Templates transform basic code into a pretty published article. They do a lot of the grunt work around here, and you should use them whenever it's possible.
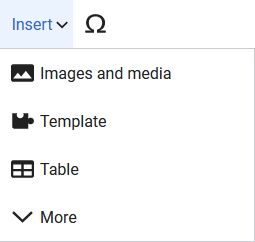
From the 'Visual' side of the editor screen, look to the bar above the editing area. Click the 'Insert' option. A popup box will appear; it lists the most commonly used elements.
Click on "Template".
A new box will ask you for the name of the template you want to use. You can find all templates the wiki has here.
Enter the name of any of the templates there and the popup box will transform into the template you chose, which then prompts you to fill it in. If you don't want to fill in the template yet, just click the 'Insert' button to place it into the page.
You can also search for templates in the search box. It has magical instant search capabilities, so it's useful when you can't remember the exact name of a template.
These are the most popular templates [someone flesh out the descriptions, please!]:
- {{Storylet}}.
- These show all the different branches on storylets. This is the bone and blood of the wiki!
- {{Card}}.
- These show all the different options on cards. More bone and blood, hooray!
- {{Action}}
- This is the heart and muscle of the wiki. It holds a bunch of stuff! It allows you to edit in descriptions for actions, action costs... and a success description... And possibly more.
Note that descriptions are shortened. This makes it especially important to end all curly brackets. Otherwise the entire page will be shortened as well.
- {{Failure}}
- You record failures here.
- {{Rare Success}}
- This is for the occasional options which offer rare successes.
- {{Success}}
- In case an action offers several common successes.
- {{Item}}
- Hair of the wiki, I guess. I'll stop now with these poor body metaphors.
- {{Incomplete}}
- To show that we don't know this information yet, the page is incomplete, or something else. If the reason for the stub isn't obvious, please also write a short reasoning. (Like "No alternate success", etc.)
Learn about other templates here.
"How do templates work?"
Wizardry: https://www.youtube.com/watch?v=xxBbUuKmV60
...Stop asking questions and get back to editing! You're not paid to ask questions! You say you're also not paid to edit? Yes, you are! You're paid in the good will you earn from your fellow man/mollusk/rodent/fungi/clay/whatever. I could write you a monthly check for GW10,000 (Good Will currency). Cashing it in will be your problem.
Editing Templates[edit]
Let's say you add an 'Action' template to a blank page. What's it look like now?
- Visual - the template has mysteriously become a grass green jigsaw puzzle piece because that's how sorcery around here works, don't ask me more questions!
- Source - the template looks like {{Action}}, or maybe {{Action}}. Both work the same.
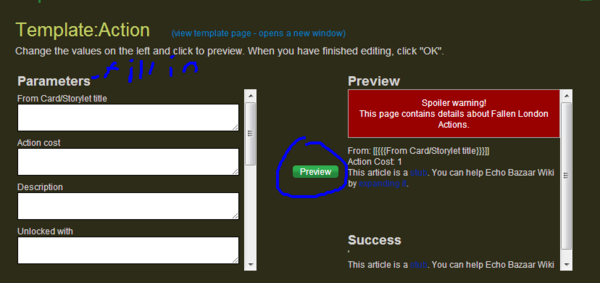
Click the Visual template to stuff its parameters with juicy Fallen London bits.
Once you've edited it, you can check how it'll look if it's published. You can either click the green 'Preview' button on the template box, or you can click the brown 'Preview' button in the upper right corner of the editor screen.
Source Code[edit]
Click the 'Source' tab to ogle and poke around the innards of a page.
Sometimes it's easier to edit things in source, because you can choose exactly what you want included in a page.
*drops a coding cheat sheet on the way out*
entrance door of a template = {{
exit door of a template = }}
template house = {{TEMPLATENAME}}
link = [[PAGENAME]]
bold = '''
bold, another method = <b>this here is bold!</b>
italics = ''
italics, another method = <i>this here is italicized!</i>
double combo of bold and italics = '''''
square bullet = *
loads an image from our Photos gallery = [[File:IMAGENAME.png]]
(The file name is the same as the FBG file name. An icon named images.echobazaar.failbettergames.com/icons/knifecandlelogo.png will have the filename knifecandlelogo.png here on the wiki. If we don't have the icon uploaded yet, just leave the link and someone will get around to upload it.
There are a few exceptions, but you'll rarely use those.)
...Flap should explain this in more detail.
basically make sure to close the brackets or it'll mess up the page's formatting- if you're trying to link a quality or item to its relevant page use the two brackets and three single quotes shown in the screenshot above.
If in doubt, check similar pages and see how they're done.
Publishing[edit]
Once you're satisfied with your work -- or, heck, even if you're not satisfied -- show the rest of the world! Update the wiki page with your changes by clicking the green 'Publish' button in the upper right corner. Whoosh! It's complete!
Undoing Edits[edit]
Someone made a boo boo? You can rewind a page to its past self through its History section.
Look at the page's 'Edit' button. Notice the white arrow pointing down? Click that for a dropdown list of options. Choose 'History'.
On the history page, click the yellow 'undo' link to revert the page to a former stage in its glorious publishing career.
Experimentation[edit]
The Sandbox is where you want to go for test trials.
'Preview' doesn't always display 100% accuracy. For instance, it can't show you how Expand/Collapse functions will look on a published page. Sometimes, you just won't know what will work till you publish it somewhere. The sandbox is the place for that.


